Nonstandard Tooth Proportions
Isaias Regalado
Management Summary
During the design of a gear train, there may exist geometric constraints leading to the use of a nonstandard center distance and a profile shift in the gears. That is the case with countershafts, or gears with small numbers of teeth where undercut is to be avoided. Besides these special cases, the use of nonstandard proportions in the teeth of the gears may be used to improve the performance of the transmission in aspects like contact ratio, specific sliding, bending strength, balance in life, scoring capability, efficiency, etc.
With the right selection of nonstandard center distance and tool shifting, it may be possible to use standard tools to improve the gear set capacity with a considerable reduction in cost when compared to the use of special tools.
This paper presents an analysis of the effects in the performance of gears due to a deviation from the standard proportions and proposes an optimization procedure for the selection of the best geometry of the gears assuming generation with a standard rack or hob.
See Nomenclature used in this article.
Introduction
The general geometry of the gears for a gear set is defined during the first stage of the design process. This includes mainly the following information:
a) Number of teeth in the pinion
b) Number of teeth in the gear
c) Normal or transverse module
d) Normal or transverse pressure angle
e) Helix angle
f) Operating center distance
g) Addendum coefficient of the pinion
h) Addendum coefficient of the gear
i) Normal or transverse backlash
j) Outside diameter of the pinion
k) Outside diameter of the gear
l) Face width
From the previous list, items "a" to "e" are the minimum necessary for a gear set with standard proportions. For a nonstandard center distance, the operating center distance and two of the items from "g" to "i" need to be defined, while items "j" and "k" must be specified if a special topping hob is going to be used or when special dimensions are required in the gear tooth height.
Information regarding the first step of gear design can be found in the literature, and the AGMA (Refs. 1, 3) has standardized the procedure for evaluation of the performance in bending and pitting of gears.
According to the AGMA (Ref. 1), the basic equations for standard tooth geometry adjusted for helical gears and in metric units are as follows:
 (1)
(1)
 (2)
(2)
 (3)
(3)
 (4)
(4)
 (5)
(5)
 (6)
(6)
 (7)
(7)
 (8)
(8)
 (9)
(9)
where:
 (10)
(10)
We can use NP or NG instead of N in Equation 5 to calculate the diameters for pinion and gear respectively.
In nonstandard gears, the profile shifting modifies the tooth thickness of the gear. Also, in order to keep the standard whole depth in the tooth, we must modify its outside diameter and root diameter. This will change Equations 1, 2 and 4 to Equations 11, 12 and 13, respectively.
 (11)
(11)
 (12)
(12)
 (13)
(13)
We can use XP or XG instead of X in Equations 11-13 in order to calculate the addendum, dedendum and tooth thickness for pinion and gear, respectively.
It is well known that the module or diametral pitch of a gear works as a scaling factor; therefore, for the purpose of this paper, the normal module will be considered unitary, and may be removed from the analysis.
The first consideration for the deviation from the standard geometry that must be considered is the profile shifting to avoid undercut (generating interference); this will give us the minimum profile shifting in each individual gear. Mabie and Ocvirk (Ref. 3) present a detailed analysis of the undercut process. Equation 14 gives the minimum coefficient of profile shifting required to avoid undercut.
 (14)
(14)
where:
 (15)
(15)
Evaluating Equation 14 for different combinations of pressure angle and helix angle, we may get a chart like the one shown in Figure 1. In this chart, any point above the red line indicates the need for a positive tool shifting to avoid undercut.

Figure 1--Profile shifting to avoid undercut. In this chart, any point above the red line indicates the need for a positive tool shifting to avoid undercut.
On the other hand, the profile shifting assigned to a gear cannot go beyond the condition of a pointed tooth; this is particularly important in hardened gears, because a hard-pointed tooth tends to be brittle. Therefore, it is a common practice to limit the minimum tooth tip thickness; in our case, we will use a minimum of 0.2mn. Figure 2 shows the tooth tip thickness for spur gears with different numbers of teeth and a 20° normal pressure angle. The red line in this figure represents the minimum allowable tooth tip thickness. It may be observed that the higher the number of teeth, the higher the allowed profile shifting before pointed teeth occur.

Figure 2--Tip tooth thickness for different profile shifting in spur gears. The red line in this figure represents the minimum allowable tooth tip thickness.
For the calculation of the deviations from the standard geometry needed in a pair of gears, we must take into account their operating center distance. Defining CR as the ratio between the operating and theoretical center distances--CR = Cr/C--we may consider three cases, namely:
CR < 1 Reduced center distance
CR = 1 Standard center distance
CR > 1 Extended center distance
In any of these cases, the profile shifting in the pinion and gear may be negative, positive or zero; and they must be calculated to get the total required profile shifting. This profile shifting is defined by Equation 16.
 (16)
(16)
where:
 (17)
(17)
 (18)
(18)
 (19)
(19)
The space defining the geometry possibilities for a specific pair of gears may be handled as a two-dimensional space where one of the axes represents the profile shifting in one of the gears (let's say the pinion Xp) and the other axis represents the center distance ratio CR. In this design space, the standard case corresponds to the point defined by (Xp = 0, CR = 1).
For the first part of this study, a design space limited by -1 ≤ Xp ≤ 1 and 0.95 ≤ CR ≤ 1.05 is evaluated, using a gear set and generating tool defined by:
Np = 25
NG = 34
φn = 20
ψ = 0°
Bt = 0.035
Ah = 1.25
Bh = 1.0
Rh = 0.3
nP = 2,000 rpm
Figure 3 shows the required XT and XG in the design space; it may be seen that XT depends only on CR. In this design space, the limits of shifting for undercut and pointed tooth Xp and XG are defined by Equations 20 and 21 and are shown in Figure 4.
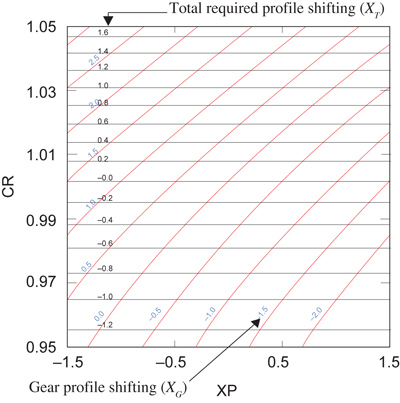
Figure 3--Gear and total required profile shifting in the (XP, CR) space.
 (20)
(20)
 (21)
(21)
Note that the limits for undercut and pointed teeth are individual for each gear and do not consider the mating gear. These limits in the (Xp, CR) space are shown in Figure 4, where XG has been calculated using Equation 17.
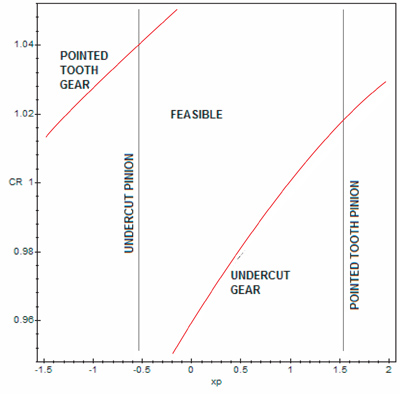
Figure 4--Limits for undercut and pointed tooth in the (XP, CR) space.
By definition, the pinion is the member with fewer number of teeth; therefore, the feasible region will always be limited by the undercut line for the pinion and either the undercut line for the gear or the pointed tooth line for the pinion (See Fig. 4).
Now considering the mating gears, some of the parameters that indicate the performance of the gear set are: root clearance, operating interference, contact ratio, specific sliding, recess to approach ratio, balance in life, etc. Each of these parameters will be analyzed separately below.
Root Clearance
The root clearance is given by Equation 22:
 (22)
(22)
where the first parenthesis corresponds to the theoretical root clearance. Figure 5 shows the root clearance in the (Xp, CR) design space. From the figure, it is evident that the greater the limit for root clearance, the smaller the allowed deviation in center distance. It is also evident that the root clearance depends only on the value of CR and is independent of the profile shifting in the pinion or the gear.

Figure 5--Root clearance in the (XP, CR) space.
Operating Interference
Operating interference occurs when the tip of the tooth in one of the gears goes beyond the point of tangency between the base circle of the other gear and the line of action. The limiting outside diameters for interference are defined by Equations 23 and 24.
 (23)
(23)
 (24)
(24)
It is important to observe that if both the pinion and gear have been generated using a hob or a rack, and none of them have undercut, this guarantees that no operating interference will exist. Therefore, if an adequate profile shifting to avoid undercut is used, interference will never limit the feasible region.
In the next section, the performance of the transmission will be analyzed for transverse contact ratio, specific sliding, recess vs. approach ratio, pitting and bending. The plots will show only the feasible region limited by the undercut line in the pinion and the undercut line of the gear, for a minimum root clearance coefficient of 0.2.
Transverse Contact Ratio
The transverse contact ratio is a numerical indication of the continuity of action in a gear set and is given by Equation 25.
 (25)
(25)
Where:
 (26)
(26)
 (27)
(27)
 (28)
(28)
Figure 6 shows the transverse contact ratio in the (Xp, CR) design space. It may be observed that the greater the desired transverse contact ratio, the smaller the size of the feasible space. It is also observed that a reduced center distance and negative profile shift in the pinion produces a better contact ratio in the gear set.
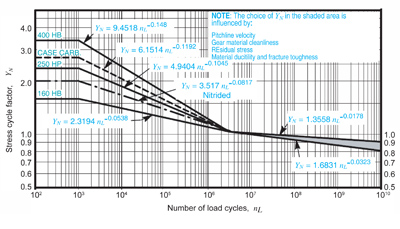
Figure 6--Transverse contact ratio in the (XP, CR) space.
Specific Sliding
The specific sliding is a way to measure the amount of sliding during the mating of the gears, and is defined by Equations 29 and 30 (Ref. 5).
 (29)
(29)
 (30)
(30)
where:
 (31)
(31)
 (32)
(32)
 (33)
(33)
and the radius of curvature will be measured from the point of tangency of the line of action with the base circle of the pinion and gear respectively to the point of analysis (Fig. 7).
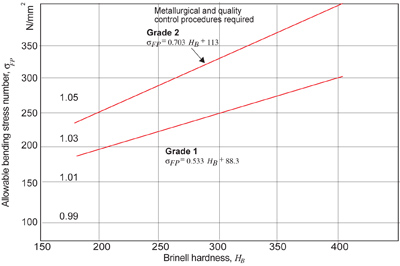
Figure 7--Radius of curvature for pinion and gear for a point "P" along the line of action.
Specific sliding may be evaluated at different points along the line of action, but the points where the maximum specific sliding occurs are the start and end of contact; therefore, only these points are considered in the analysis. Figure 8 shows the maximum absolute value of specific sliding in the (Xp, CR) space. Note that an extended center distance design with zero to positive profile shift for the pinion produces smaller specific sliding values. Some authors recommend a specific sliding no bigger than 3, and that constraint is accomplished inside the feasible region at the upper centered part of Figure 8.
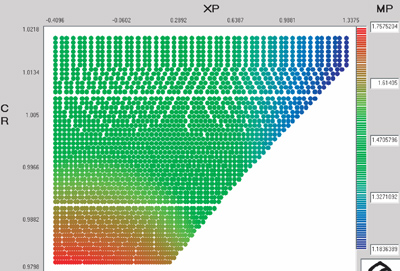
Figure 8--Specific sliding in the (XP, CR) space.
Recess to Approach Ratio
Another way some authors suggest to measure mesh smoothness is the ratio between the length of approach versus the length of recess; some designers even use what is called a full recess action gear set where all the contact takes place above the operating pitch circle of the pinion. The length of approach and recess are given by Equations 34 and 35. Figure 9 shows the recess to approach ratio in the design space. According to the figure, the more positive the profile shift of the pinion, the bigger the recess/approach ratio. In fact, the exact full recess action occurs when Xp = 1.
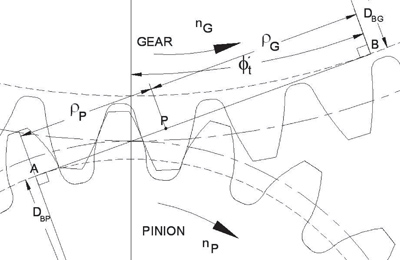
Figure 9--Ratio between recess and approach in the (XP, CR) space.
 (34)
(34)
 (35)
(35)
where:
 (36)
(36)
 (37)
(37)
 (38)
(38)
 (39)
(39)
Pitting and Bending Strength
Per AGMA (Ref. 2), the pitting stress in the gears is given by Equation 40, and the relationship to evaluate pitting durability is given by Equation 41.
 (40)
(40)
 (41)
(41)
Also, the corresponding expressions for bending stress and bending durability in the gears are given by Equations 42 and 43, respectively.
 (42)
(42)
 (43)
(43)
where
H is contact stress number N/mm2
ZE is elastic coefficient of the materials [N/mm2]0.5
Ft is transmitted tangential load N
Ko is overload factor
Kv is dynamic factor
Ks is size factor
KH is load distribution factor
ZR is surface condition factor for pitting resistance
b is net face width of narrowest member
ZI is geometry factor for pitting resistance
σHP is allowable contact stress number N/mm2
ZN is stress cycle factor for pitting resistance
ZW is hardness ratio factor for pitting resistance
SH is safety factor for pitting resistance
Yϑ is temperature factor
YZ is reliability factor
σF is bending stress number N/mm2
KB is rim thickness factor
YJ is geometry factor for bending strength
σFP is allowable bending stress number N/mm2
YF is stress cycle factor for bending strength
SF is safety factor for bending strength
For each particular design, most of the factors remain unchanged, and they may be included in de-rating factors defined by Equations 44-46.
 (44)
(44)
 (45)
(45)
 (46)
(46)
Also, AGMA recommends that, for a general-purpose application, ZW = SH = YZ = Yϑ = SF = 1; therefore, the major effects in the stress calculation are given by the geometry factors ZI, YJP and YJG. Also, these factors appear in the denominator of the stress calculation equation, and thus, the bigger the factor, the smaller the stress and the bigger the strength.
Figures 10-12 show the calculated geometry factors for pitting and bending in the design space.
From Figure 10, it is observed that, for better pitting strength, an extended center distance and a positive tool shifting in the pinion are recommended. Figure 11 shows that in order to improve the bending strength of the pinion, a positive tool shifting in the pinion is required and is almost independent of the value of CR. Figure 12, on the other hand, shows that we must use an extended center distance and a negative tool shifting in the pinion (positive in the gear) if we want to improve the bending strength of the gear.
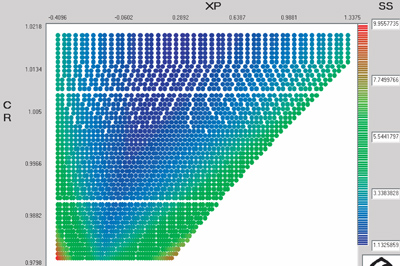
Figure 10--Geometry factor for the calculation of the pitting resistance in the (XP, CR) space.
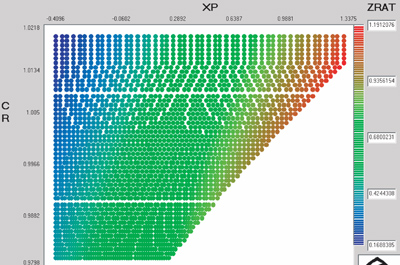
Figure 11--Geometry factor for the calculation of the pinion bending strength in the (XP, CR) space.
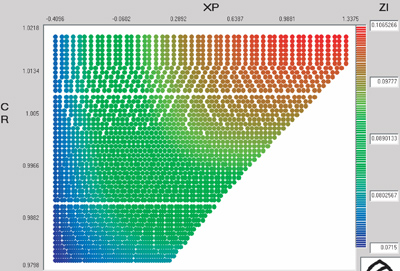
Figure 12--Geometry factor for the calculation of the gear bending strength in the (XP, CR) space.
Due to the fact that the number of cycles of operation in the pinion is usually bigger than in the gear (speed reducer)--and in order to get a balanced durability in pinion and gear--it is a common practice to use a stronger material in the pinion than in the gear. A more refined approach to this practice is the selection of a nonstandard proportion gear set, wherein the ratio between the bending geometry factors is equal to the relationship given in Equation 47:
 (47)
(47)
For our example, assume that a 400-Brinell, through-hardened steel pinion will be used with a 250-Brinell gear, and an equal durability in both gears corresponding to 106 cycles in the pinion is required. First of all, being a speed reducer, the required durability in the pinion corresponds to 7.35x10⁵ cycles in the gear; therefore, from Figure 13, the required stress cycle factors are:
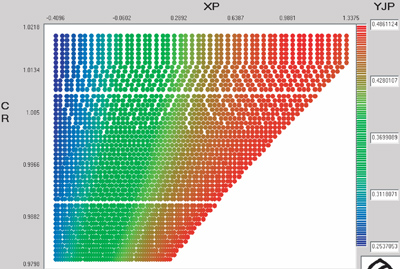
Figure 13--Bending strength stress cycle factor, from AGMA (Ref. 2).
YNP = 1.2232
YNG = 1.2043
Per AGMA (Ref. 2), the allowable bending stress number for a through-hardened steel is obtained from Figure 14. For our example,
¦ÒFP = 300 MPa
¦ÒFG = 220 MPa
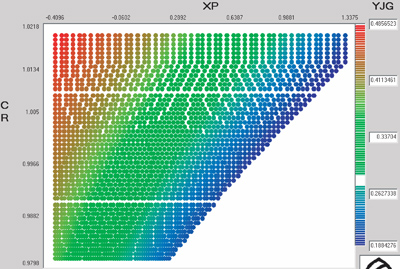
Figure 14--Allowable bending stress number for through-hardened steel gears, from AGMA (Ref. 2).
Therefore, the following ratio is required:
 (48)
(48)
Figure 15 shows the ratio YJP/YJG for the (XP, CR) space, where the contour for the desired ratio is traced with a black line.
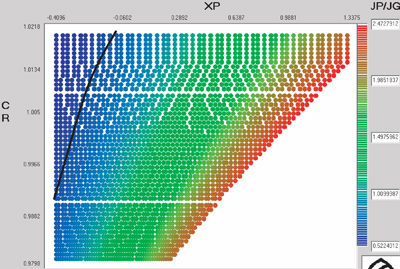
Figure 15--Ratio YJP/YJG in the (XP, CR) space.
A similar analysis may be performed for a desired life relationship between pitting and bending of pinion and/or gear. In general, the selection of the best combination of (XP, CR) for a particular gear set must be based on the specific needs of the application, and some tradeoffs must be made between the performance criteria. These tradeoffs are beyond the scope of this paper, and more information may be found in Reference 6.
As general guidelines, we suggest the following steps:
1) Select the number of teeth in pinion and gear using the procedure outlined by AGMA (Ref. 4) for the preliminary selection of the best number of teeth. When possible, it is recommended to use a hunting tooth.
2) Determine the limits in profile shifting for undercut and pointed tooth in each gear.
3) Define the limits of variation in operating center distance based on the desired root clearance.
4) Define the desired values for transverse contact ratio, specific sliding, recess/approach ratio and expected bending and pitting life.
5) Establish a preference level for each of the required performance criteria (Ref. 6).
6) Find a point in the (Xp, CR) space that best satisfies the required performance criteria with the desired preference levels.
Conclusion
We have shown that the performance of a gear set may be changed considerably by changing the tooth proportions and center distance from the theoretical (standard) values. It has also been observed that the improvement of some performance criteria may lead to the deterioration of others. A tradeoff between them must be done in order to get a better gear design.
References
1. American Gear Manufacturers Association. "Proportions for Coarse Pitch Involute Gears," ANSI/AGMA 201.02, 1968.
2. American Gear Manufacturers Association. "Fundamental Rating Factors and Calculation Methods for Involute Spur and Helical Gear Teeth," ANSI/AGMA 2101-C95, 1995.
3. Hamilton, H. Mabie and Ocvirk, Fred W. Mechanisms and Dynamics of Machinery, John Wiley & Sons, 1978.
4. American Gear Manufacturers Association. "A Rational procedure for the Preliminary Design of Minimum Volume Gears," AGMA 901-A92.
5. Maag Gear Company Ltd. Maag Gear Book. Zurich-Switzerland, 1990.
6. Keeney, R.L. and H. Raiffa. Decisions with Multiple Objectives; Preferences and Value Tradeoffs, John Wiley & Sons, 1976.
Dr. Isaias Regalado is a gear design specialist at CIATEQ, a consultancy and research center from the National Council of Science and Technology in Mexico (CONACYT). He has more than 15 years of experience in gear-related projects. He received his Ph.D. by developing a project for robust optimization of gears at the Gear Dynamics and Gear Noise Research Laboratory at Ohio State University, and he has presented publications at the AGMA FTM, as well as at other technical forums.
