Noise Analysis for e-Drive Gears and In-Process Gear Inspection
Ensure optimum quality in a fraction of the time
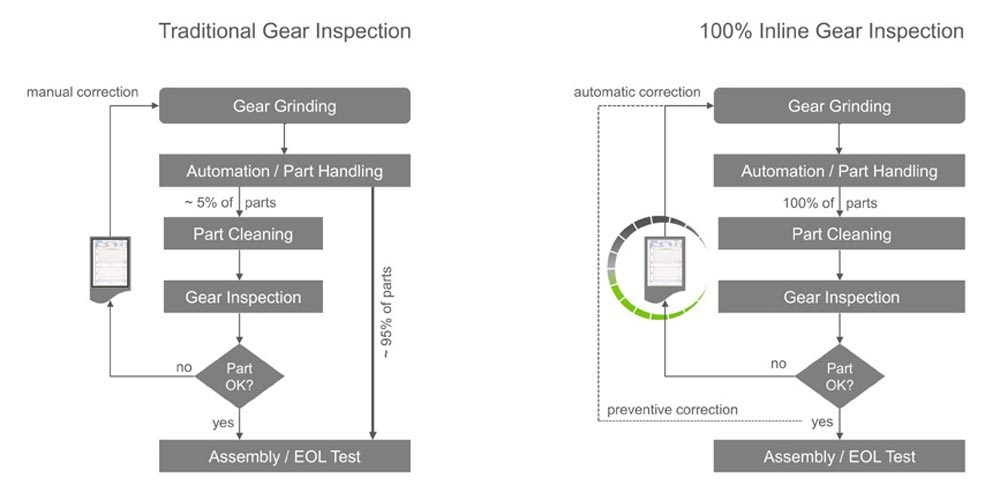
Traditional gear inspection versus 100 percent in-process gear inspection.
In conventional gear manufacturing, quality control is carried out for a number of pieces per batch. Most parts enter final gearbox assembly without any inspection. Among other things, this approach is based on two facts: measuring time is significantly longer than the machining time, and the limited measuring capacity available. In hard fine finishing, for example, continuous generating grinding, it is not unusual to measure only one or two workpieces per dressing cycle or directly after the machine setup. Depending on the dressing cycle, the number of inspected parts corresponds to only about 5 percent of workpieces produced in total. However, to guarantee almost 100 percent reliability, statistical evaluation is instead used to validate the gears being produced. Typical measuring characteristics can be represented and statistically evaluated with a Gaussian bell curve. By deliberately narrowing down tolerances on the measured components, it is possible to guarantee compliance with the actually required drawing tolerances with a sufficiently high probability (typically greater than 99.99994 percent). This method is commonly used for machine and process capability studies and is globally recognized. The machine or process capability values cmk and cpk frequently taken as a basis are usually set on or above 1.67. Statistically, the reject rate is only 0.57 workpieces per 1 million manufactured workpieces, which means that only about 50 percent of the intended drawing tolerances are available as manufacturing tolerances. This situation is aggravated by the fact of increasing quality demands, especially with e-drive gears due to NVH and other topics leading to increasingly tight tolerances. Clearly, this high dependency on statistics poses a significant challenge to a growing number of gear manufacturers.
Another problem of traditional gear inspection is the long (waiting) time between part removal for inspection and the actual availability of measured results. Waiting and inspection time can easily amount to between 30 to 45 minutes depending on the inspection room capacity. After inspection, a decision must be made whether a correction of machine settings is necessary and the implementation of such corrections must be carried out by the machine operator taking additional time, all while the production is continuously running, good or bad. So far, today, the focus has been given to establishing a “closed loop” connection between the metrology system and the production machine, installing the measuring machine near the production machine, e.g., by employing so-called “shop-hardened” metrology systems.
Now, what would an ideal solution to overcome the described challenges look like? Ideally, all parts could be inspected immediately after they have been produced, bearing various advantages. The quality achieved on each workpiece could be documented. Workpieces out of tolerance could be corrected immediately by a closed-loop auto-correction system. And even better, by inspecting up to 100 percent of parts, one could also monitor trends and apply preventive corrections before parts are getting out of tolerance. The goal would result in predicting whether a workpiece could cause noise issues within the gearbox after its assembly.
So, the key to creating an ideal situation is a metrology system that is capable of inspecting gears as fast as they are produced, and which can easily be installed close to the production machine.

Influence of machine capability values on probability to match the tolerance.
In-Process Gear Inspection—Roll Testing and Laser Inspection
In 2018, Gleason introduced a very special metrology system. The GRSL combines the latest non-contact analytical gear inspection with well-proven double flank roll testing of gears applied in most of today’s high-volume gear production environments in order to achieve 100 percent inspection of specific attributes. But the GRSL is much different than these traditional systems. It tests both the composite functional error by double flank roll testing with a master gear as well as an individual gear’s characteristics of involute, lead, and index error by applying laser scanning technology.
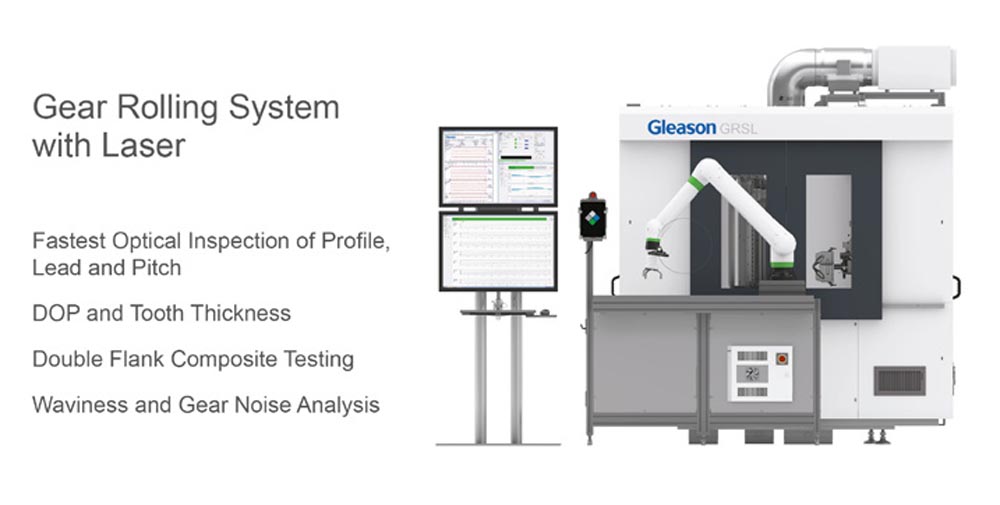
GRSL—Multiple inspection methods combined in one platform.
During the roll testing cycle, two laser heads move automatically into position to scan both gear flanks (left and right) simultaneously. In addition, different sections along the face width of the gear can be scanned to inspect even the lead. Laser technology significantly reduces the overall inspection time compared to a standard tactile measuring system. Example: The inspection time required for a typical, automotive planetary pinion can be reduced with laser technology by a factor of four, from roughly 2.7 minutes down to 39 seconds. With the inspection time being greatly reduced, this process can even add additional value by measuring profile and lead on all gear teeth—not just the usual inspection of only four teeth around the circumference of the gear.
With such comprehensive data available through laser scanning, it is also possible to further evaluate gears beyond standard gear inspection habits such as profile, lead, pitch, runout, and size. In addition, the 3D laser used on the GRSL gathers much higher-density data at higher speeds than a traditional tactile probe. The gear flank area seen and scanned by the laser probe at any given instance during the measurement is much higher than using a contact probe. The contact probe simply makes a point contact while the GRSL laser emits light in the form of a line, which provides typically up to 4 mm scanning measurement area at high frequency with a sample spacing of microns. This allows capturing a large surface area of gear with higher density at much faster inspection times. Such a high-density measurement of the entire surface is simply not practical to achieve with a tactile probe. For a typical 2D trace such as a profile or lead trace used for gear measurement, a 3D laser probe captures 10+ times more data points at much higher speeds than with a conventional tactile contact probe.
Understanding the profile and lead of all teeth makes it possible to calculate a so-called “Advanced Waviness Analysis” resulting in an order analysis of the gear topography waviness. In contrast to the traditional gear measurement technique, where periodic components or waviness are only captured as form errors ffα or ffβ in the profile and/or flank line, Advanced Waviness Analysis goes far beyond this. Advanced Waviness Analysis evaluates periodic errors in the profile, the flank line, or the pitch according to their frequencies/orders and their amplitudes and essentially corresponds to the waviness analysis according to VDI/VDE2612. Measured profile and/or flank lines of all teeth are first connected to each other along the correct path of contact. The obtained “signal” represents a theoretical transmission error and is then decomposed into its corresponding components (frequencies/orders and amplitudes) either by an FFT or with the aid of a Gaussian least square method.
Order analyses are shown for the profiles (involute) and flank lines (lead) on the right and left tooth flanks. The lower section of the chart summarizes the most conspicuous orders and amplitudes in table form. This allows for quickly distinguishing between mesh harmonics, mainly influenced by the gear design, and other orders, so-called “ghost orders” which typically have their root cause in manufacturing errors.
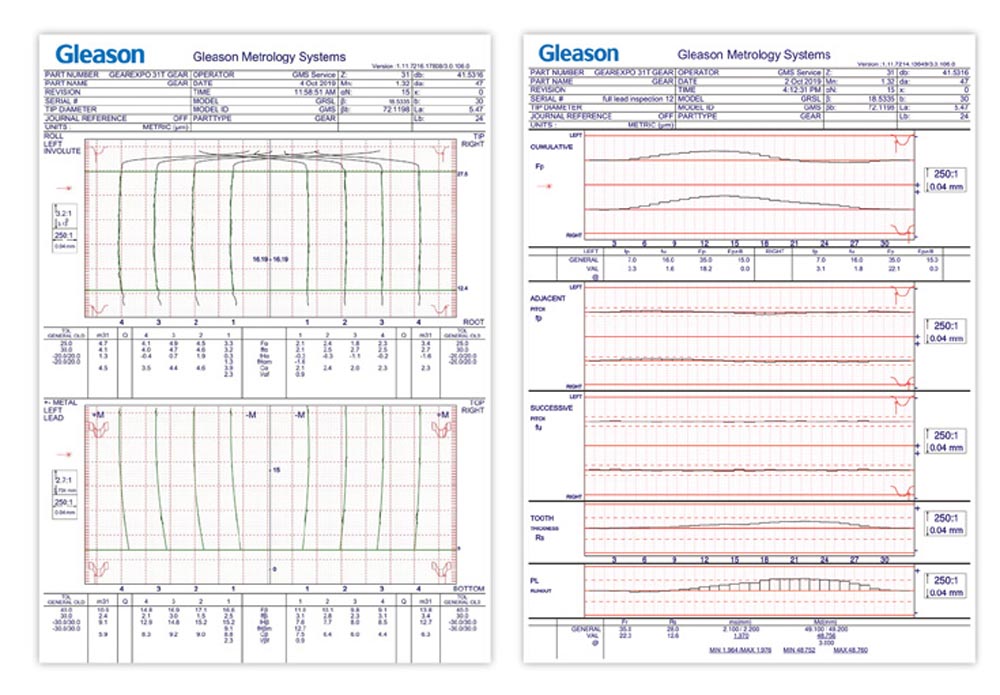
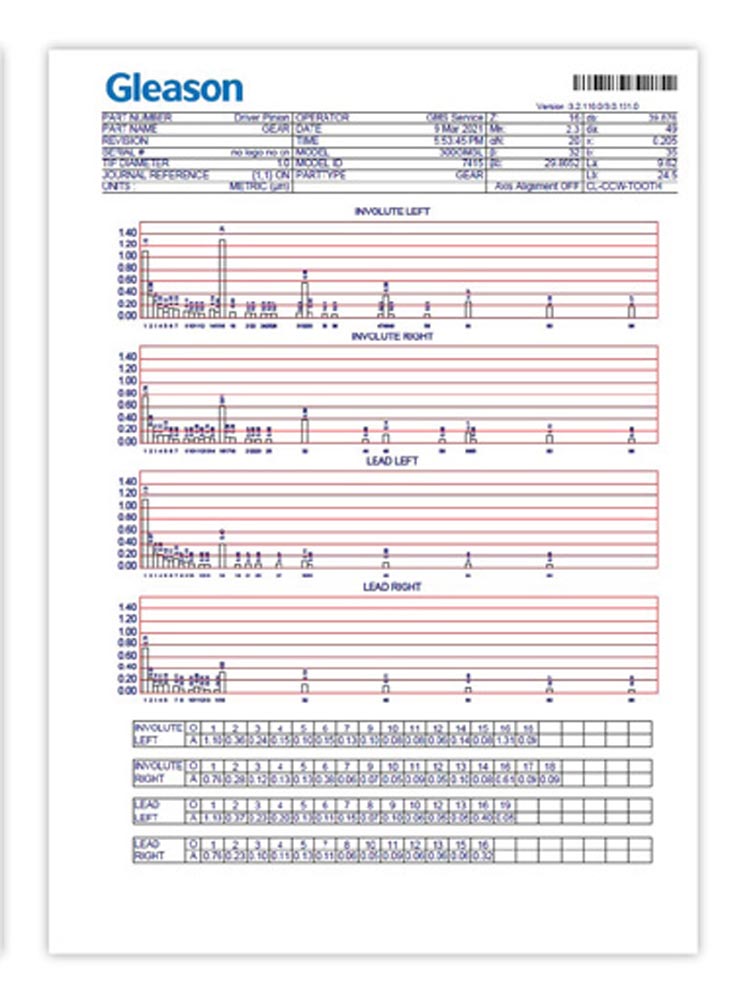
Chart possibilities of a GRSL including advanced waviness analysis.
Whereas in single flank roll testing the actual transmission error between gear and master gear is detected and displayed as an order analysis, in Advanced Waviness Analysis the transmission error is calculated from measured profile data. This method has been put to use for years and provides the advantage of employing existing analytical inspection equipment rather than an additional single flank roll tester. However, this process bears a specific disadvantage: it takes a long time (on a standard metrology system) to determine profile data of all teeth required for calculating the order analysis. With Gleason’s new GRSL, it is this very profile data that can be acquired extremely quickly, eliminating the disadvantage of tactile inspection. With the calculated order analysis and its corresponding amplitudes (Advanced Waviness Analysis), it is possible to detect potential noise issues such as ghost orders. These orders are not related to the mesh harmonics of the gear and are typically caused by small irregularities created during the manufacturing process or by the production machine itself. Such Ghost Orders can cause problems once they exceed a specific amplitude. To date, such order analyses are carried out on a random basis only due to the high inspection effort involved.
With Advanced Waviness Analysis and the possibility to inspect up to 100 percent of the production output, it is now possible to evaluate every produced gear regarding potential noise issues, sorting out nonconforming gears before they are assembled into the gearbox. This is a novelty in the gear industry and a game changer especially for the inspection of e-drive gears since e-drive applications are particularly noise sensitive.
Integrating Metrology into the Production Flow
Gleason’s Hard Finishing Cell (HFC) seamlessly integrates in-process metrology into the manufacturing process. This fully automatized manufacturing cell features threaded wheel grinding, washing, part marking, and a GRSL Metrology System, all connected by a robotic loader with a basket-based palletizer system. The integrated automation is made by Gleason’s own automation solution provider. The robotic loader handles the complete workflow within the cell, including part handling between the grinding machine, washing, and part marking stations, as well as the metrology system.

The stacking cell accommodates baskets of various manufacturers and styles and is ideally suited for the autonomous processing of large lot sizes of gears.
The 200/260GX uses a double spindle concept to bring down nonproductive idle times to an absolute minimum with less than four seconds per workpiece change time. Machine setup is extremely easy and fast using Gleason’s Quik-Flex Plus Workholding, just one tool for the exchange of all mechanical components and a menu-guided workflow for all necessary setup steps.
In addition to four different dressing systems for highly productive or flexible production, today’s quality demands require modern grinding processes. This includes the possibility to grind gears with extremely good surface quality and twist control. A novelty in the industry is that neither grinding nor dressing times is negatively affected by Gleason's twist-controlled grinding process.
Gleason’s Closed Loop system connects the grinding machine with the integrated GRSL metrology center. Inspection results are directly returned to the grinding machine without any involvement of the operator. The machine compares the measured values with the target nominal values and automatically performs the necessary corrections. With the GRSL being directly integrated in the Hard Finishing Cell, results are available right after the workpiece has been ground, typically in less than five minutes. Compared to the traditional approach of gear inspection in a separate inspection room, reaction time is dramatically reduced. And most probably the biggest advantage is that with this new system, for the first time ever it is now possible to evaluate every produced gear for potential gear noise issues by using Advanced Waviness Analysis.
Summary
e-Drive gears differentiate from other automotive gears by two essential points: Higher Quality and the need for excellent noise behavior.
Gear noise can have many causes. When gear noise issues occur, many people start to look for the causes in the manufacturing process only. However, this is not always the root cause. In order for a gearing system to function quietly, it must first be designed properly according to the load characteristics which will appear later in the real gearbox. Even perfectly designed gears are subject to manufacturing errors that can also lead to gear noise often called “Ghost Noise”. Hence, it is important to have analysis tools capable of detecting potential noise issues and to distinguish between manufacturing and design reasons. The gear inspection thus has another important task, namely the reliable detection of potential noise issues.
Gleason’s Hard Finishing Cell provides the capability to inspect up to 100 percent of workpieces with a fully integrated GRSL Double Flank Roll Tester and Laser Scanner. The ground gear is transferred to the GRSL for inspection of all relevant gear characteristics including profile, pitch, runout, and, if desired, lead—in real-time. In addition, Advanced Waviness Analysis can detect gears with potential noise issues such as ghost orders. Deviations determined in the hard-finishing process are fed back directly into the production machine by means of a closed correction loop. If deviations are within tolerance, fully automatic correction and real-time adjustment of the corresponding parameters can be automatically achieved. During traditional gear inspection 45 to 60 minutes may pass between removing the workpiece from the machine, its transfer to the inspection room, waiting in line, the actual inspection process and the analysis of the measurement result. Compared to the conventional measuring process, HFC’s in-process inspection and Closed Loop correction ensure optimum quality in a fraction of the time. With up to 100 percent quality control, statistical evaluation can be eliminated from the manufacturing process, resulting in stringent compliance with tolerances according to original drawings.
